
A Major rebuild of a middle aged Nethercott International Canoe, with a bit of a diet involved.
This page continues from the first half of the rebuild.
10/11. I've got some time off work so I need to get my mind together and finish this boat. Its starting to get late in the year for epoxy too without running up my parent's electricity bill too much. No photos today, I left the camera at home. I suppose I shall have to ride the bicycle back home and collect it - another three hours gone...
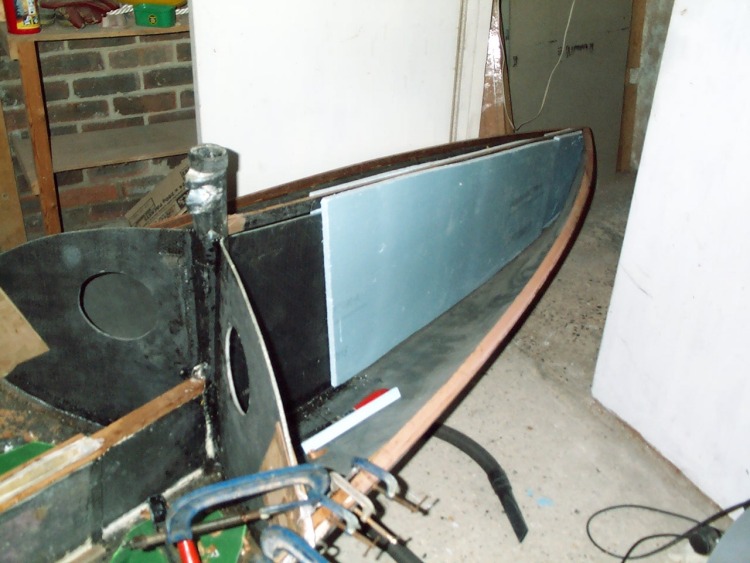
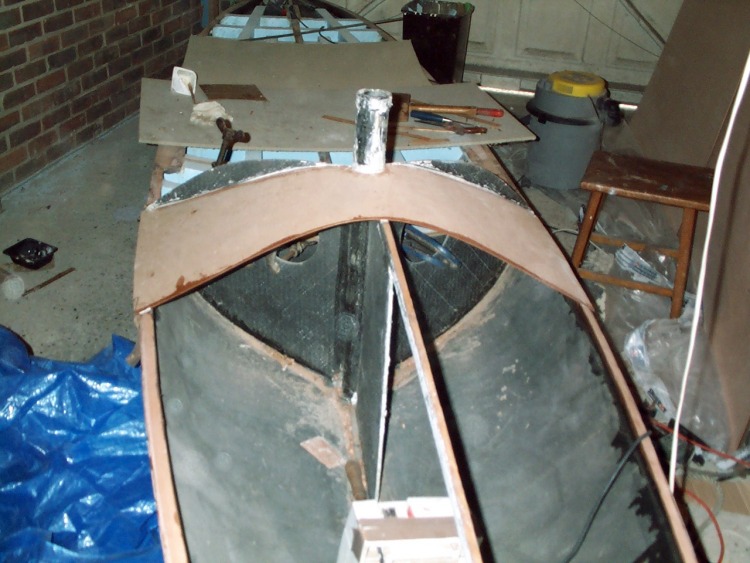
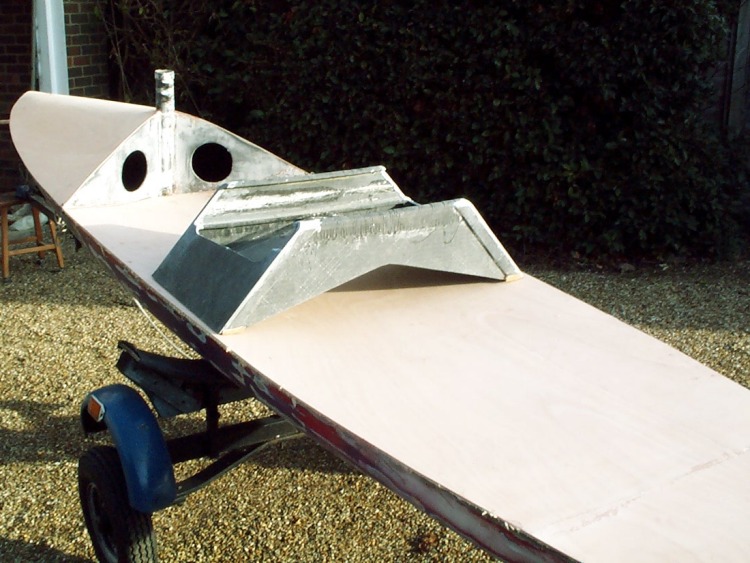
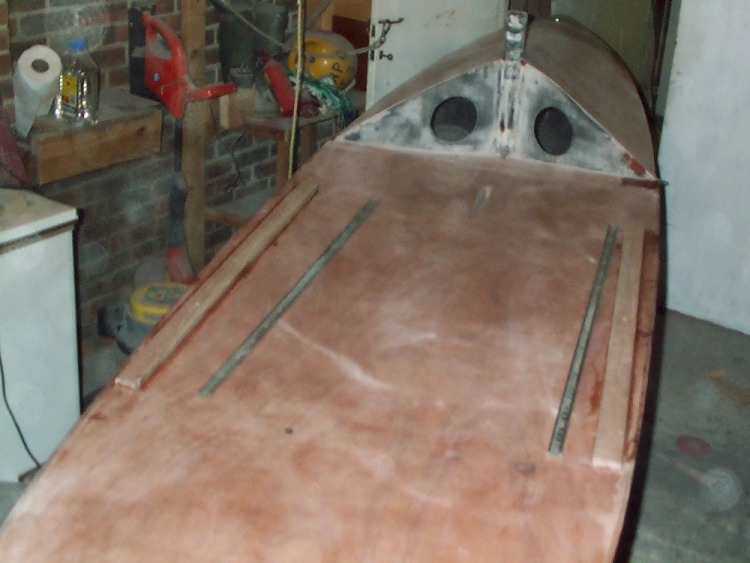
Anyway today I glued in the last part of the stump supporting structure, a shortis (foot or so) section of carbon panel running forwards. I used a short section like this rather than a full length spine when I first built the Cherub and regretted it as the gunwhales bent apart under rig loads, but the loads are a lot less with the canoe and there's also going to be a carbon beam under the foredeck. I also started cutting styrofoam which will take the place of the rest of the spine. There's been some discussion on the precise meaning of the rules regarding buoyancy, but I've decided that I'm going to be pretty liberal with the foam, and also divide the hull up into two tanks. The styrofoam spine will divide up the bow into the two tanks and also go towards however much foam is required, which to me isn't altogether certain. It will also envelop the cedar/carbon foredeck beam and help stop the beam from getting out of column. Reckon it ought to be solid enough.
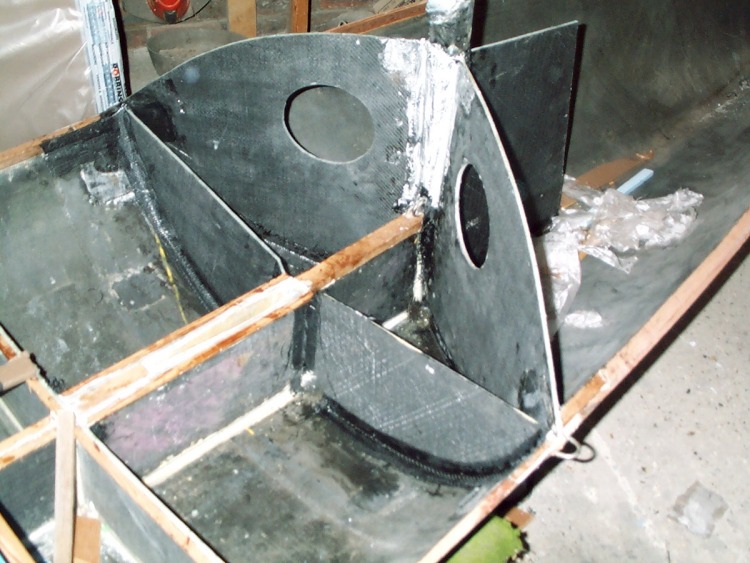
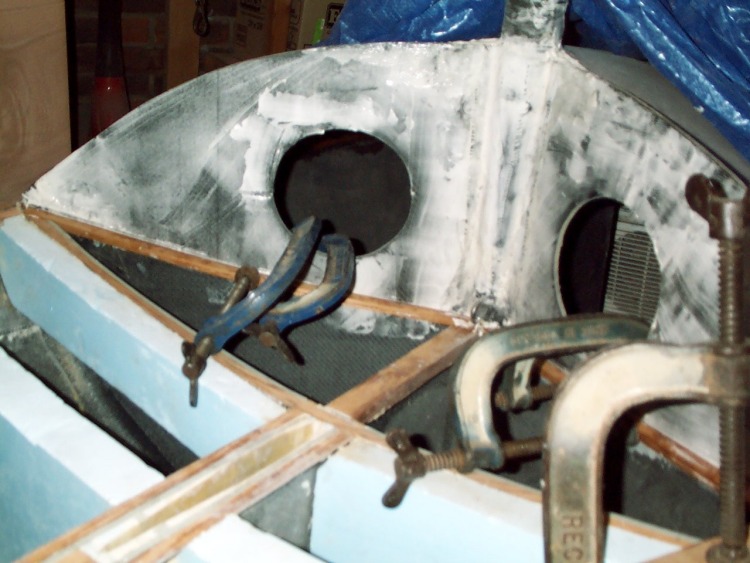
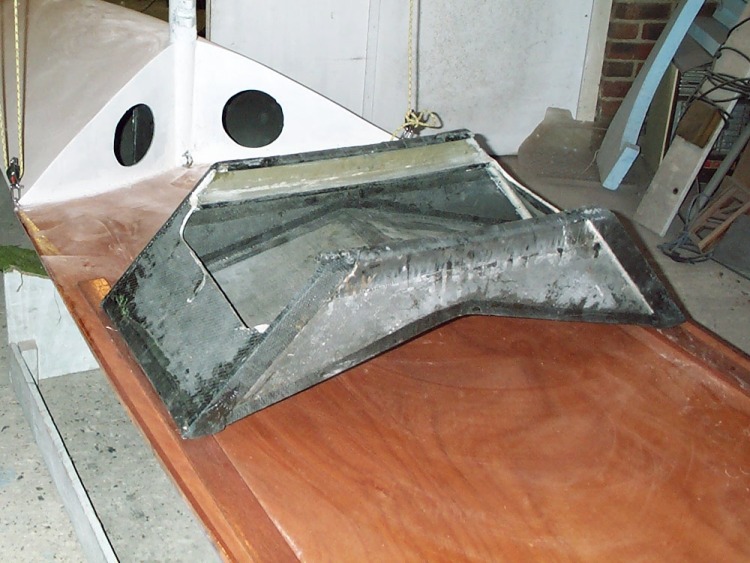
11/11. Carbon taped all the front bulkhead seams and made some more styrofoam deck beams. Made up an extension for the spine aft of the rudder box from a bit of Cherub front bulkhead left over from when I reworked the interior a few years ago. I like each boat to have a piece from a previous one for some reason. I did some work on the critical hull/front bulkhead join. I've also decided to put in a small bulkhead supporting the daggerboard case up to the shrouds. It ought to be OK with the deck supporting it, but its not much weight and also helps support that area of the deck. It needs to be said though that this is a classic example of losing control of the weight budget - lots of little things add up...
12/11. Went and picked up the camera, the seat tracks, some carbon tape and other things I left behind. There goes another day! All I really got done was some more detail work at the gunwhale/bulkhead instersection. I removed the original inner gunwhale at the shroud point - it was especially thin and rotten on one side, and so the bulkhead is glued to the outer skin with three layers of unidirectionals and two of cloth over the join. Then I've replaced the inner gunwhale again with some cedar strip, and there's another two layers of unis and one of cloth over the intersection and along to the orginal gunwhale.
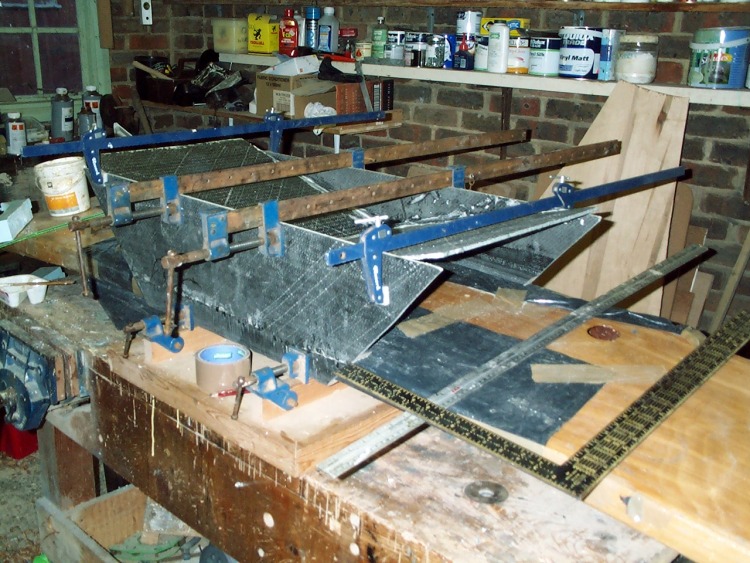
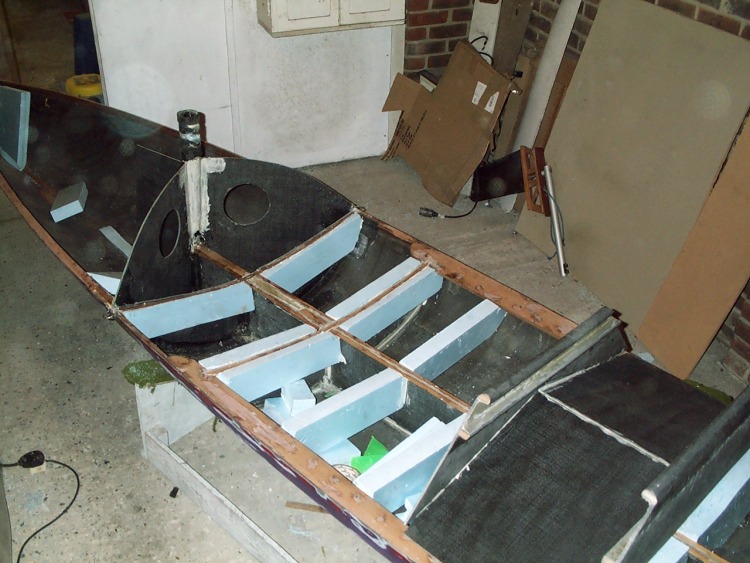
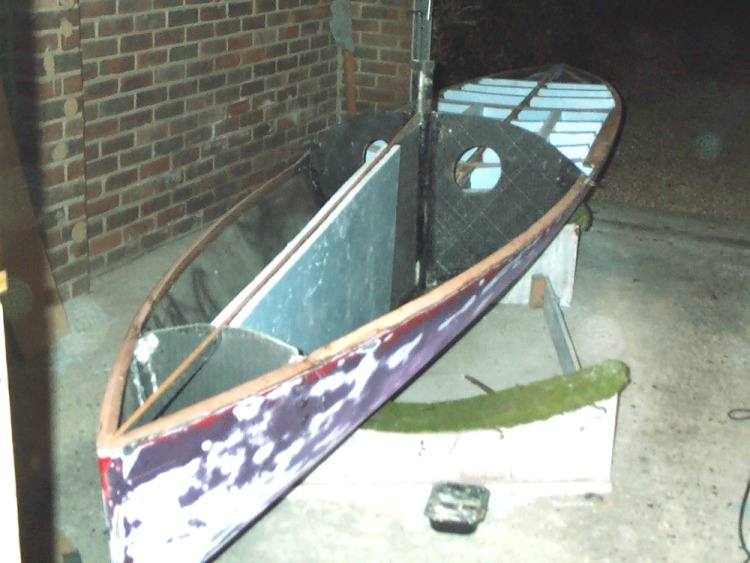
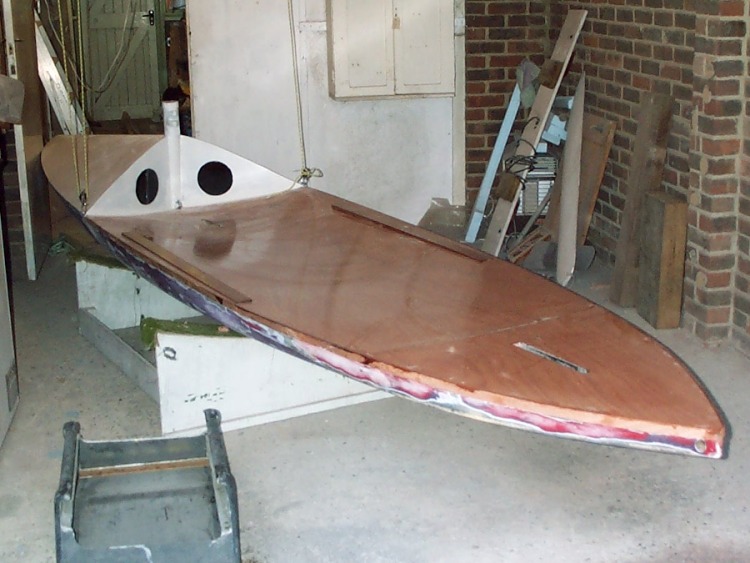
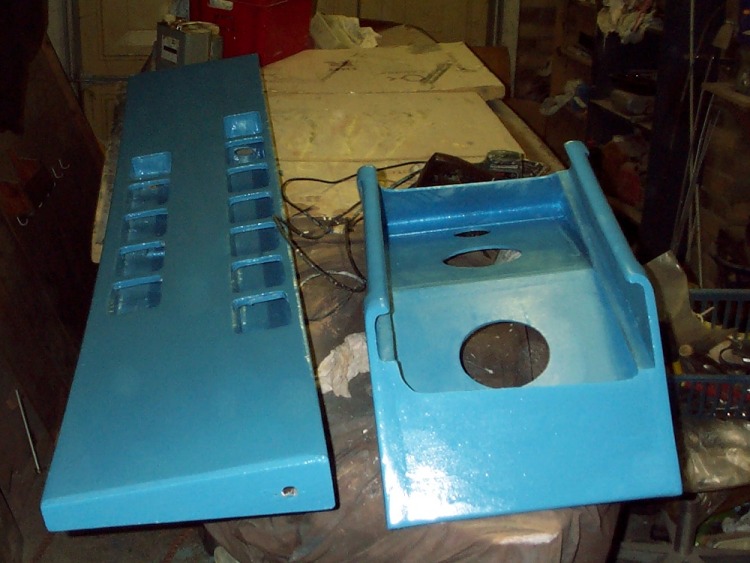
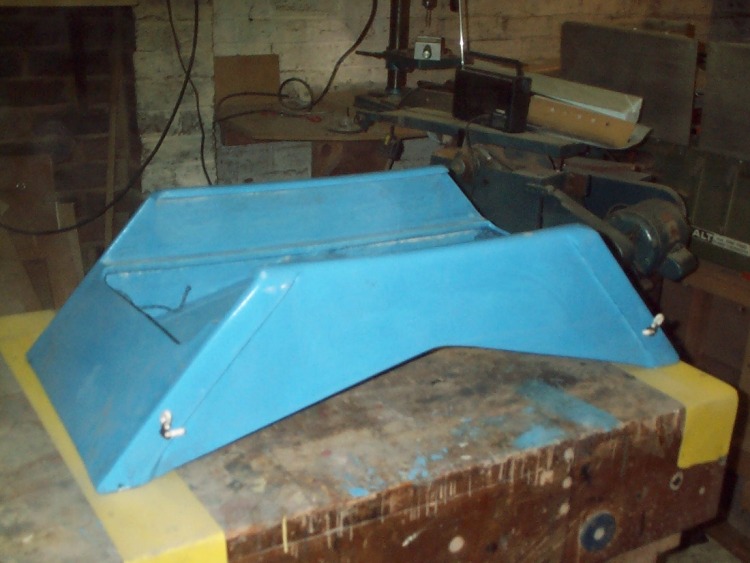
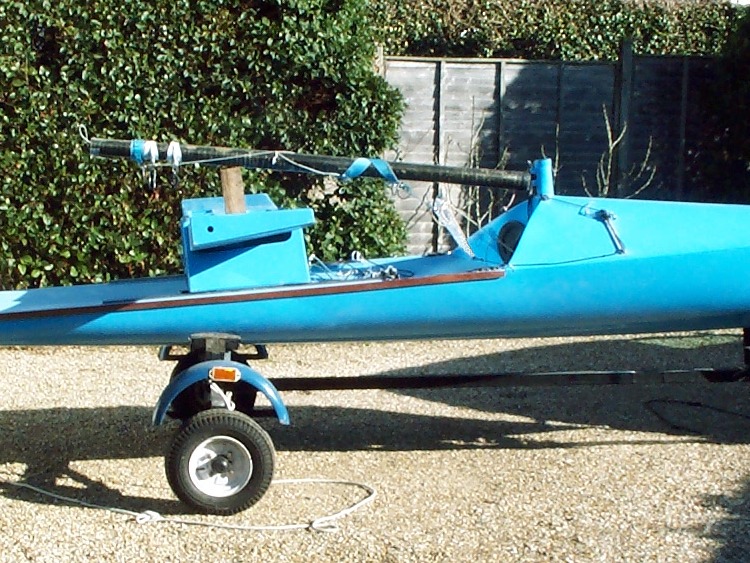
13/11. Glued and taped in the daggerboard support bulkhead. This would be quite unnecessary in a boat with foam decks, and maybe I should have gone that way, but I don't enjoy working with large bits of foam laminate, and doing the job half decently would really mean vacuum bagging. I also glued in some more of the transverse styrofoam bulkheads. The worrying job of the day was gluing up the seat carriage. I've been putting this off a bit. I'm really not sure how much allowance to make to allow the seat to slide freely. The ends have been glued to a bottom piece and assembled round the seat. There's quite a thickness of plastic tape and cloth round the seat, so I hope its enough. I suppose it will be one hot summer's day when I find out it wasn't. It does seem to slide reasonably freely at the moment, although there's a fair bit of fabrication and scope for error yet. I've gone for an unconventional carriage design, with front and back with the same profile and a top rail on boat a little over half the width of the boat. There's probably a bit less air drag as there is less carriage exposed on the lee side. Its possible to get an idea of this in the photo below: its a bit difficult to make out but the seat is in the carriage, partially wrapped in black plastic, and the whole assembly is upside down.
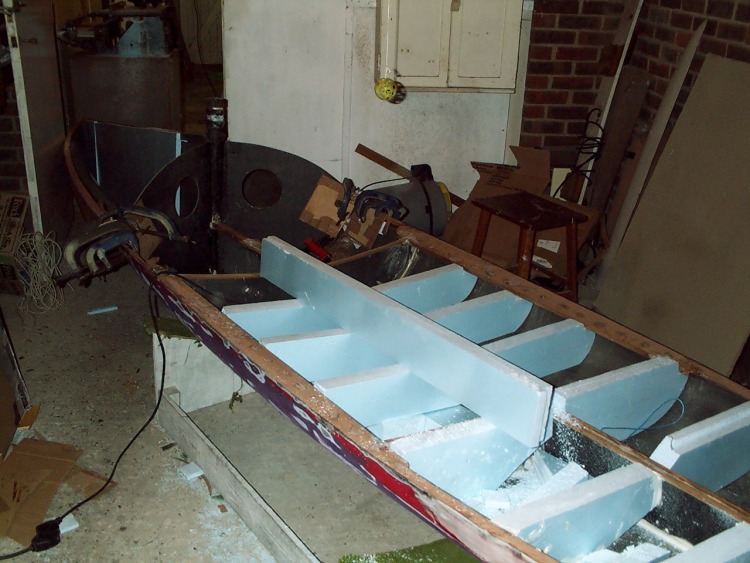
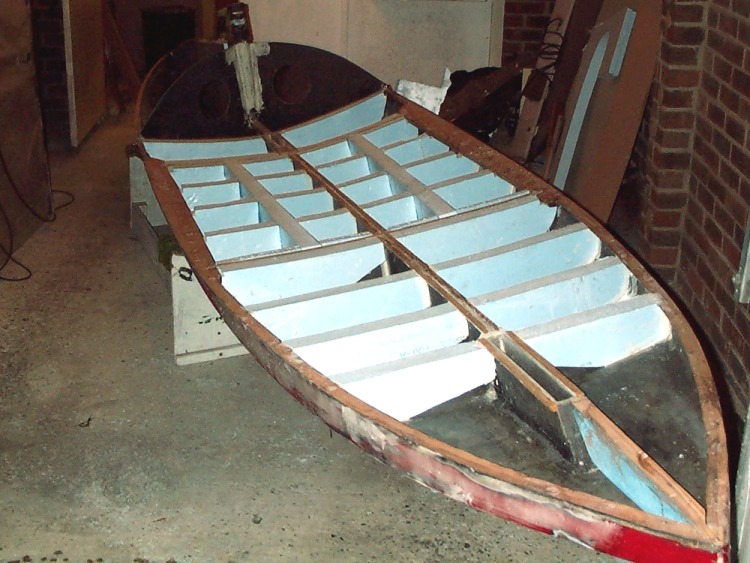
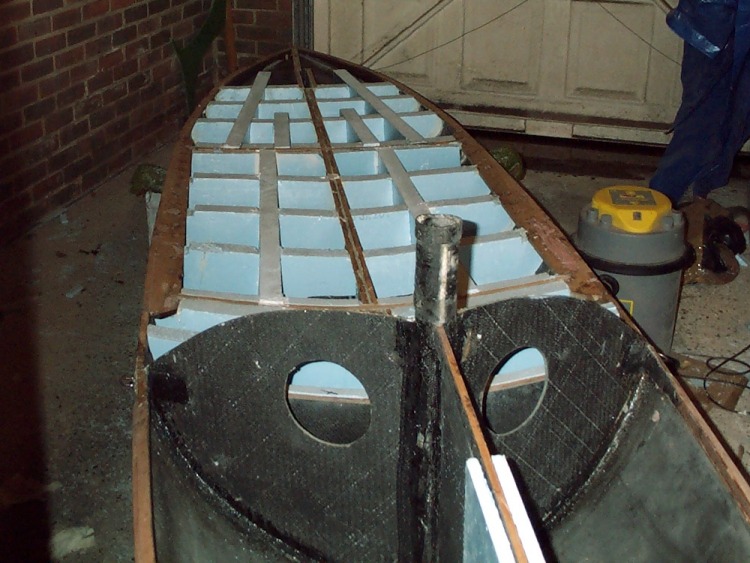
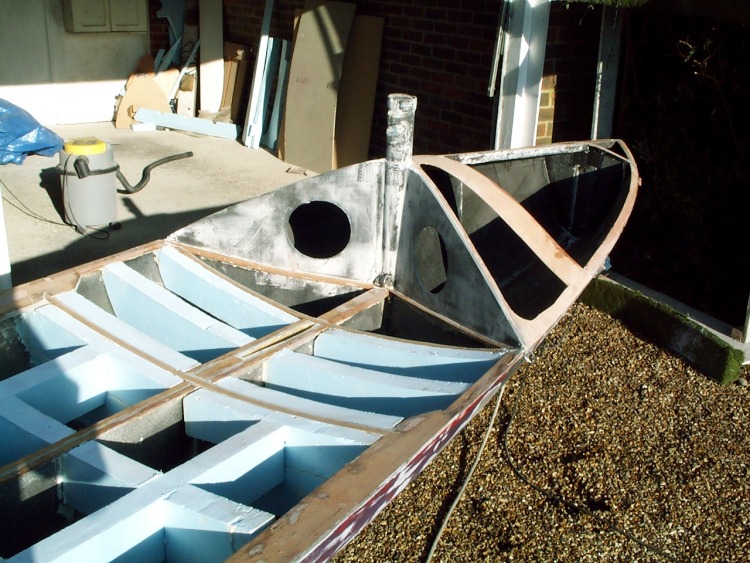
14/11. Glued in the last of the transverse styrofoam "frames". There will be a longitudinal one each side too, but that will wait until the transverse ones are all levelled and smoothed off. The ones nearer the bow are 120mm deep and don't touch the floor, so I suppose are really beams rather than frames. Strength wise I can stand on a 100mm piece of styrofoam spanning half a metre, and these will be supported so the span doesn't exceed 200mm so they ought to be proof against any reasonable handling.
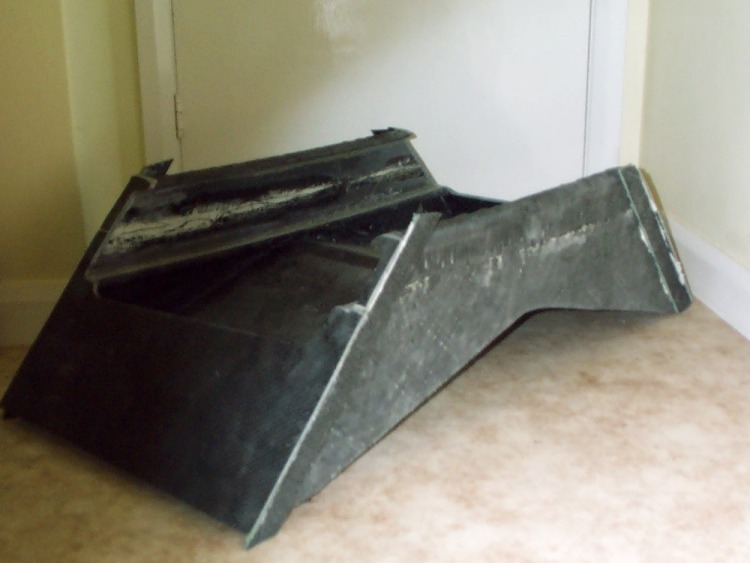
I stripped all the (partially peeling and partially so solid as to be heat gun proof!) varnish off the sliding seat I will be using and made some repairs. In the pic below the carriage, still far from complete, is sitting on the boat to give an idea of the shape.
15/11. Not a lot worth a photo today if the truth be told. I made up the "supports" under the styrofoam deckbeams, which are more styrofoam of course and in truth make them pretty much into frames. I'd managed to let one of the beams twist whilst settling, so I had to rip that one out and rework it. I also carbon taped the inner joins in the seat carriage, then went and did some PC support for a relative...
Thanks, by the way, to the people who have emailed feedback: good to know that this is interesting some folk out there...

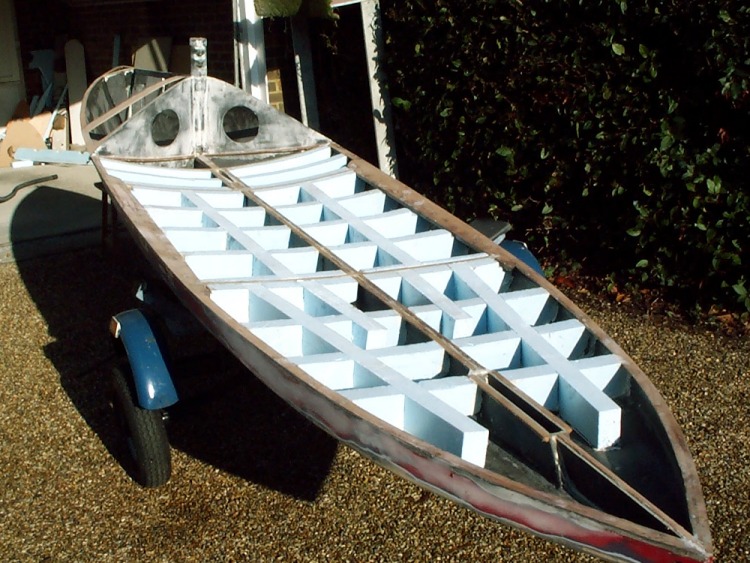
16/11. More unspectacular and indeed somewhat tedious stuff. Took the last of the varnish off the sliding seat and sanded down filler on some minor repairs. Most of the day was spent on styrofoam, which I am getting quite bored with. The first longitudinal beams are in, and quite shoddily too - if you look at the enlargement you'll see some pretty awful joinery. In the introduction I talk about this being a standard of workmanship you can achieve - well in this case you can definitely do better! Its no big deal, a bit more filler and all will be fine, but I shall need to concentrate a bit harder when I get to the exterior jobs. The bulkhead for the jib is in. I still haven't decided how I shall attach the fitting for this. I really don't like screwing high load fittings into wood, but there's no access for bolts, and my normal unidirectional carbon bandage would mean cutting a slot in the deck plywood before fitting it, and would be untidy. That's probably the best choice though.
17/11. I shall spare you yet more essentially similar photos today. All the longitudinal beams are now made, in place and glued in. The rest of them have been done a little less incompetently than the first two after I sat myself down and gave myself a lecture this morning! Its stil a long way from Rob Michael standard though. There are a couple of extra lateral frames I've decided I needed made and ready. I just need to make up a support for where the deck joins the front bulkhead: this really ought to be cedar, but I have to work out how to get the right curvature. I have an idea involving battens tacked to the next two frames being used as a jig. I may take tomorrow off, and give myself a break though.
Monday should contain a moment or two of truth as I am proposing to borrow a spring balance and do some weighing. If she comes out too heavy I shall have to do some mad cutting of holes in everything I can think of and otherwise chop up anything that might yield a few kilos. I shall also have to weigh the mast and so on to get a target: that's the trouble with all up weight!
Another job will be to get all the multitude of frames and beams sanded off flat so that a single piece of ply will touch every one. the surface should be straight for and aft, so I shall pick up the laser level and use that - if I can get the red line flickering across every surface it should be reasonably fair... Could take a while!.
18/11. Another day with little spectacular progress. A gale blowing through the garage made it difficult to keep temperatures up enough for epoxy to cure properly. I glued in the last two styrofoam beams and did a bit of general gapfilling round the styrofoam.
The more interesting job of the day was some more fabrication of the new seat carriage. This is now complete as regards the main structure with the exception of the cedar strips on the base that the sliders will bolt on to. I'm going to leave the rest of the carriage until the deck is on and I can get these at exactly the right angle - parallel to the deck, which slopes in slightly. Then there will need to be a good deal of reinforcement and that should do it. At the moment the structure feels delightfully light, but of course its very easy to build a light structure - the challenge is to build a light structure that is strong enough, which at the moment this emphatically is not!
19/11. Out came the balance. Ouch. The numbers are as follows:-
| Item | kg |
|---|---|
|
|
|
| Hull, no decks or paint | 34 |
| Daggerboard | 2.5 |
| Rudder | 1.75 |
| Mast and rigging | 5 |
| Seat (no paint) | 10.25 |
| Carriage (estimate) | 3 |
| Seat tracks | 2 |
| Crate of gear (inc crate) | 5 |
|
|
|
| Total *excluding* decks and paint |
63.5 |
Which is clearly too much. Bother.
So what to do. The obvious first thing is the styrofoam bulkhead dividing the bow tank in half. That can come out and I'll arrange the whole bow to drain out through one side only. I'll still have two tanks, but one will be around double the volume of the other. I suppose the port side had better have the smaller tank... That should save about 2.5kg. The next is of course holes in everything feasible. I don't think putting holes in unsupported styrofom beams is a very clever idea, so none of that, but just about all the lateral beams are full height and can lose some material. Out with the hole saw. I'll go around looking for grammes on wood strip and all the rest of it. I probably put getting on for a kilo too much structure in the mast stump, but its hard to say. By the time I figured it was getting heavy it was tricky to lose structure from it. I don't mind the carriage disintegrating becuse I've underbuilt it, but the stump is just too integral to the structure...
Todays work: sanded down bulkheads and frames flatter: using a laser level to try and spot the high bits (the red streak needs to touch all the frames if possible!). Hassly job, needs more skill and patience than I have, but important as this affects how much filler will be needed to hold the deck on. Put on some little slivers of cedar to make the gunwhale up to a decent glue surface width just aft of the shroud, glued in the foredeck beam and glued in the divider aft of the rudder case and made the holes for the bungs. The divider ended up as a piece of the standard 5mm carbon bulkhead - the piece of ex Cherub just weighed too much. Trimmed down the reinforcing pieces on the carriage and filleted the inner seam on the ends generously which will get carbon over the join next. No pictures today - all these fiddly little bits don't really advance the photos over the day before. Finally I made a cardboard template for the foredeck. I want to use some of the deck ply to reinforce where the jib tracks will go and a couple of other things, so I need to be sure which bits I can use. I'm still mulling over the forestay fitting - I really want the load to go onto the bulkhead, not the forestay beam, which is difficult to arrange with the carbon bandage. I may have to give up and put a piece of something I can screw into there, but I'm not happy with that as an option.
20/11. Well, mainly chopping stuff out today. Taking out the styrofoam bulkhead in the bow tank and spending two hours paring down gunwhales has got the hull weight down to 30.5kg. I haven't been able to chop holes in styrofoam frames - the hole saw I have available here just won't do the job. I shall think about that - I would really like to get the shell down to under 30kg if possible, and my sums say that there is still way over the required amount of foam to meet any interpretation of the buoyancy rules.
I've made a bit of a start on the foredeck. In order to get some support for the jib tracks and get a good fastening onto the bulkhead I've made a vaguely butterfly shaped piece of ply which I will fillet onto the bulkhead and which will double up under the jib track. When its glued in place I'll chop a lot of it out to reduce weight, but I want it solid for now to get a good curve for the deck. For the forestay fitting I've decided to put a U bolt through, which is a favourite option of mine for other jobs. This will go straight through the foredeck beam and weaken it, and is in any case high load so I've put 3 layers of carbon unis across each intersection between beam and foredeck, two layers of cloth round the beam where the bolts will come and another layer of unis down the bulkhead over the other end of the 3 layers. I ought to do drawings for some of this I suppose...
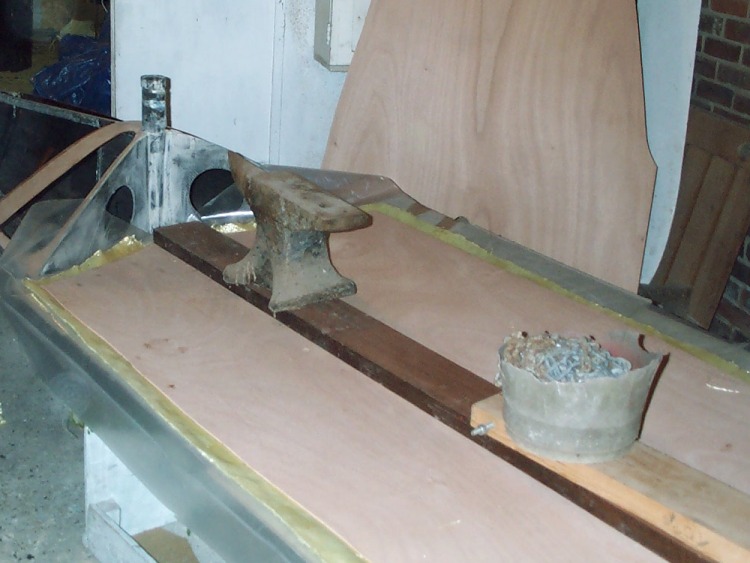
21/11. Preparatory work for putting the decks on. Glued in the " butterfly" support for the foredeck and also a thin strip on the forestay bulkhead. The bare 5mm foam isn't enough to get a reasonable glue line. I finished up fairing all the deck beams. Its a bit of a game to get an even shape because each frame has an increased radius from flat at the stern to considerably dished at the front bulkhead. What I did was to use an aluminium metal rule and placed it across the frame from gunwhale to gunwhale, and then pressed it down towards the centreline stringer and sanded down everything that touched the rule before the centre stringer made contact. Fore and aft the rule again and also the laser beam as mentioned before.
The next interesting task, one I've been putting off, was to attach a batten to the front bulkhead to take the deck. A previous owner of my boat had left this one out, and just put loads of bog on top, but that doesn't appeal to me. I've never had to face this one before because my Cherub had a false floor right to the bow, and there were separate bulkheads above and below the floor, which was much easier to arrange. Anyway, after some thought the first thing I did was to get out the rule again and scribe on the front bulkhead exactly where the top surface of the batten should come. I then made up four cedar strips approx 2.5mm by 10mm, so nice and flexible, and cut rebates in the centre and gunwhale for 5mm thick beams. I laminated two strips of cedar each side, put them in the slots, and to keep them at the right curvature located a G cramp so that it was preventing the laminated beam springing up past the scribed mark. Another cramp to hold the laminated beam against the deckhead and its looking fairly acceptable.
Finally I cut out the "butterfly" so that there's just the thin strip at the bulkhead for the glue join, and a thicker piece where the jib track will be, and put good fillets on the various joins. Progress is really slowed by it being late in year without a heated workshop - after every significant job the relevant part of the boat has to disappear under plastic sheet with the heater to cook off the epoxy. The effect of the deck support as revised makes it look very like the arrangement used in many Twelves where the kite is "bagged" into similar bays in the foredeck. Thinks, there's a challenge for you AC boys, bagging the kite instead of using a chute [grin].
22/11. More prep work for puttting the decks on. Tidied up the pieces put on yesterday and put a second coat of varnish on all the timber inside the decks (apart from the glue joins of course). Decided (I've been agonising over this because of the weight) that I really must put a layer of kevlar on the underside of the crewdeck, so went out and bought it. I did quite well for breaking the old decking so its silly not to really... Cut out cardboard templates for all the decks, and made a very caution start on a scarf joint for the crew deck. First time I've tried making one! There was actually sunshine today so I took a few photos in the sunlight while I gave the floor a good cleanup.
23/11. A bit more progress visible today (although currently its under a tarpaulin with two heaters and I have just been wincing about a forecast of very low temperatures.
I started by finishing the scarf joint for the deck ply and gluing it up. When it was finally cured I took a look and decided it was desperate. However the reverse side doesn't look too bad so I've turned the ply over! Ran over to Rob Michael's workshop to "borrow" (as if you can borrow peel ply!) for the kevlar on the deck. Explained what I was planning to do, which was greeted with some horror! However its really about the difference between the pro and the amateur. What I have done is to put the fibre on the deck, a layer of peel ply, put it to cure on the boat, reesting on polythene and some fibreboard so that it cures roughly to the right shape - I don't have much confidence of bending fully cured laminate too far. Rob just lays up the fibre on the deck and puts it straight on the boat. That's fine if you have a good eye for the resin/fibre ratio and all that, and can get the fibre throughly wetted out yet not dripping in surplus resin. I have no confidence in my ability to do that, hence the extra stage of work required.
Anyway having laid up the deck it was necessary to get deck and all to bend to shape. A bolt through the daggerboard case and a beam the length of the boat would be an elegant solution. As you can see from the photo I took a slightly more agricultural approach! Then with that on and curing there was just enough time to epoxy the underside of the foredeck and glue it on with plenty of staples holding it in place. A quick flash of the camera and then its under the tent and on with the heat... You can possibly also see the approach I took for the forestay fitting - the U bolt on before the deck went on and a slot in the deck for it to project through.
24/11. Glued on the crewdeck. I nearly managed to put it on crooked but spotted my error at the last minute. I planed down the foredeck edges close to where they need to be, ready to sand down the last couple of mm, and have glued the cedar strips that will form the foot of the sliding seat carriage into place. The boat is now covered in plastic sheet with the heat underneath and the epoxy should be curing. Tomorrow I have to pack up because its back to work next week, but I have another week off coming in a week's time (I didn't take any holiday earlier in the year in case there was a boat building project coming) and hopefully I can finish things off. The jobs list will not be too big. I need to put some gunwhales on (not found on many ICs, but I sail from a reservoir and frequently park the boat against jetties so the extra bit of protection is worth a couple of hundred grams or so), make up various brackets for fittings and things, finish up the seat carriage with loads of unidirectional fibres, and then paint and varnish. I may commission Rob M to do the paint at least, but it depends on how his schedule and my wallet are looking...
25/11. End of this session. I planed down the edges of all the decks and cut out the rudder and daggerboard slots. Then it was time to tidy up. Oh, and take a look at the pieces of mahogany I had planned to put under the seat rails and decide that they are in fact too thin and I need to get some more timber. Drat and double drat. I'm not unhappy with the progress in the fortnight, although it would have been better if I hadn't lost a day to the weight crisis. In the next session I should be able to finish the carpentry and start thinking about options for paint etc. I was thinking about varnishing the crew deck, and trying out an idea I have for non slip - putting peel ply down on the varnish its nearly cured to give a textured finish, but since my scarf joint isn't that clever maybe I'll just finish it with International deck paint, which while maybe a tad heavy has the wonderful capacity that it never seems to come off...Maybe varnish the foredeck, although I do have this idea for an extreme paint job I ought to try...
4/12. Late start to this weeks sessions - I was required elsewhere over the weekend. I started the day by remedying an almighty stuff up I made yesterday. When using the bandage carbon round stainless steel ring metal ring technique for shroud anchorages it is of course key to ensure you don't sand off the carbon. You guessed it. So I had to cut some holes in my new decks and rework the shroud fastening on one side. You may guess that I'm not over pleased with myself. Well, it makes up my mind as whether to varnish or paint the decks...
With that done I finished sanding down the edges of the deck ply, filled in staple holes, and attached gunwales. Although these are technically unnecessary on an IC, when said IC lives at an inland club and is rigged from moderately hostile jetties, then something sacrificial along the sides is really quite appealing. They will stop off at the shrouds: the aim is to protect the edges of the crew deck ply. They also cover the inevitable hairy edge of the kevlar reinforcement. Also on todays list was some reinforcement on the seat carriage. No pictures: I'm prepared to admit my mistakes, but draw the line at publishing photographs of them.
5/12. Sanded off yesterdays filled pinholes and other bits, found some more bits requiring filler, filled them, and slapped on a coat of International UCP. I looked at the plywood and decided that the grain, colour etc was pig ugly and so I have no regrets at all about being forced to paint it. I need to make up battens to go under the sliding seat. The original pieces are too narrow, but I think what I'll do is to make up a thicker piece, the width of the tracks, from left over gunwale material, and then plane that down. Mind you I should also consider whether to replace the current track and fittings entirely with the alloy pattern that Rob uses, but that may need a wider support. Then I put some more reinforcement on the carriage - two layers of unidirectionals and one layer of woven tape down the reinforcing strip at each corner, with the last 10mm or so going round the corner onto the ends. I think all it really needs now are some more unidirectionals over the ends and under the wood panels, as there isn't a great deal of overlap of the ones I put down the side - the angle of the carriage profile means that the flat tape crosses only the corner of the base. I'd mixed up a bit too much epoxy, so I made up a thick filler paste with the rest and ran it over the topsides where they meet the foredeck, which should sand down for a clean corner. No real point in publishing photos of all this - another layer of reinforcement on the carriage, some filler, it doesn't really add much over the last shots does it!
6/12. Just about my least favourite phase at the moment. Finding
little holes and blemishes, adding filler, waiting for it to cure,
sanding, dust, yet more dust, hateful dust...
I'm *really*
not in the right frame of mind for this at the moment which is
probably obvious by the tone... Never mind. Last layer of
reinforcement on the seat carriage this morning, across the bottom of
the reinforcing strips and also along the bottom seam. I hope this
damn thing doesn't break first time out! Turned the boat over,
laminated three layers of carbon (plus, in the "crash" area
a couple of layers of kevlar) over the area where there used to be
the large cutout for the cassette centreboard system, filled, much
sanding of odd bits. Must go and do some more filling in a minute...
7/12. Finished off tidying up the daggerboard area on the underside and turned the boat over again. Sanded down the primer on the decks, and went shopping. I was hoping to have Rob Michael spray paint the boat for me, but he's too busy at the moment to fit it in. On the one hand I hate painting boats, and aren't much good at it, but on the other hand I haven't got to live up to Rob's terrifyingly good craftsmanship, which is a bit intimidating for an amateur bodger like me. I think it was the wonderful Terry Pratchett who came up with the concept of the approximate carpenter (a couple of nails and it will stay up all right). I guess the approximate boat builder is "another layer of carbon unis and lots of filler and it shouldn't break".
Anyway got to the shop and discovered that those expletive deleteds at International have stopped doing my standard boat light blue in two pot - indeed their range of two pot polyurethane seems to get smaller every year. So they've lost a customer in favour of Blakes, who do something of a reasonably similar shade. I don't suppose the boat will end up all light blue if I can arrange things to my liking though...
Last job of the day was to put on the mahogany strips that the seat tracks will sit on. I got my measurements wrong when I ordered up the timber and the bits I got for this were too small. I was about to look for local timber merchants when I checked the odd bits of timber my father had. Amongst them was a nice piece of light mahogany the right size and length, but horribly warped, doubtless the reason why it hadn't been used. Now for this job the warping is a positive virtue, because the strip needs to be glued down to the shape of the deck, which is a steeper angle at the bow end of the track to stern end, so I seized this piece with glee, cut it in two and glued it in place. When it's cured it will need to be planed down so that its flat horizontally so that the seat tracks can be located correctly. I think that will be the last bit of carpentry.
Incidentally I think I have a bit of a problem with fitting out... As you can probably see in this photo the D ring I've located on the mast post for the kicker is as low as possible, so that the kicking strap is at the steepest possible angle. All well and good, except that I need to get a turning block for the cunningham/downhaul located so that the line runs under the vang and the block doesn't get crushed by the kicker, and I have a nasty feeling that it might be just a little too close to the deck. Mr Harken's smallest turning block and a bit of luck I suppose... Come to think of it if all else fails I could just offset the line 6 inches to one side!
In theory there's light at the end of the tunnel now, but in practice the last few little jobs always take far longer than you could possible dream! There are quite a few odds and bits to do with the fitting out to fabricate too.
8/12. Planed down the strips for the seat. Did it by hand as my father has some very decent long planes, which made it a lot easier to get it flat. Then more filler, more sanding, getting things ready to paint. I'm currently cursing my decision to flatten down the front bulkhead instead of leaving it in peel ply finish with lumps, but I guess it will look better... The trouble is once you've started you've got to finish: filled flat but with bumps lumps and hollows is the worst possible option really! I got another coat of UCP on the crew deck and some undercoat on the foredeck and front bulkhead today. The undercoat is a bit of a disaster - it needed huge amounts of stirring and didn't flow out properly. I'm wondering if maybe the tin was outside usable life. Anyway the finish is dreadful. Still much of the first layer of undercoat always gets sanded off anyway, but I think this will pretty much all have to come off. It does seem to be curing which is the main thing at this point. More UCP on the crewdeck tomorrow I think, then it can be sanded back and the deck paint on to finish that next time. I'm going to do a lot of reading of tech sheets on the Blakes website when I'm at home and have broadband before I do anything with the undercoat. If its good it will need heavy thinning before use.
9/12. Usual Sunday morning tidy up before I return home. I'm going to try and make some progress on the carriage at home, but the garage at home is full of the Eleven Plus that *was* going to be this winter's project. For those who don't remember or are too young the Eleven Plus was a teenagers two hander about eleven feet long that, coincidentally, both Andy (Bloodaxe) Paterson and I sailed in our teenage years. It was a little bit faster, nicer to sail and more sophisticated than a Mirror, though without spinnaker. Our present day equivalents sail 29ers, which just shows how things, especially money available to teens, has changed. Or was 120 quid for a ten year old Plus in 1972 more money in real terms than 5 grand for a 29er now?
Anyway yesterday's white undercoat on the foredeck looks just as desperate as I feared if not more so, but it is curing so should sand down OK. I'll have to get to grips with the paint better and sand it down well for a second coat. The crew deck looks fine though. I think I'll sand it down a little next time and give it one more coat of UCP before putting on a single coat of deck paint. Actually I ought to give the seat battens a second coat of UCP before I leave today. I shall go and do that now.
10/12. Paint update. Looks as if my problem with the u/coat primer
was using it outside specs. It seems that as well as a minimum air
temperature for application, which I was only just within, there's
also a minimum pot temperature, which is a good deal higher! I'll
need to keep the paint in the house I guess, and thin appropriately .
Moral: read the specifications in detail and don't paint your boat in
the winter unless you have a heated workshop. I was going to
construct a polythene tent in the shop to keep the dust off for the
final coats, but it looks as if I'll need one for all of the job to
make it easier to keep the shop warm.
Paint Update 2. A Tech
support guy from Blakes *rang* me today in response to an email form
I filled in on their website on Sat evening. Top marks for customer
care guys. He confirmed my supposition about temperature. He also
pointed out that the reason the hardener was slightly yellow instead
of clear is because its epoxy rather than polyurethane based. I
really should have RTFM more carefully over the whole episode
shouldn't I!
11/12. I got a very tactfully phrased email from Steve (USA) Clark querying my carriage design, and suggesting that it would be better if the lower rails were full width, otherwise the loads on the seat are magnified. Well, I have only one thing to say to that, to wit: "Oh B****r". SHC is of course quite right, and I need to either rethink things a bit or else not go sailing in waves... remember that disclaimer in the intro pages? Yep, that's quite a stuff up!
15/12. Another coat of undercoat/primer on the foredeck, working much working much better with the paint warmed and appropriately thinned, and a third and final coat of clear primer on the crewdeck. Another coat of undercoat/primer on the foredeck tomorrow, and then back home. Next time I'll turn the boat over and put a coat of primer/undercoat on the bottom and start spotting all the dozens of places that could to with a little filling and smoothing. Sigh. You don't want pictures of successive coats of paint I'm sure, but in any case you're not getting any!
16/12. As promised put another coat of undercoat/primer on the foredeck. that was a surprise, wasn't it!
23/12 OK, now to see if last night's coat of undercoat on the underside of the hull is ready to sand. I also need to figure out whether I should put on a second coat. Its weight and money: I'd rather not!
26/12. Wet sanded the two coats of undercoat I put on yesterday. On inspection there are numerous blemishes and so on. Sigh. Watered down some ordinary waterproof filler considerably with paint thinner and brushed it on. I wonder if this will be any less hassle than the normal method. That's it for a couple of weeks. Sigh.
Decided the boat needed more undercoat, so slung on one coat
yesterday and another this morning. Hopefully it can be wet sanded
tomorrow and maybe just enough time for a coat of topcoat. I wish I
could easily judge when paint has almost but not quite got thin
enough for the colour underneath to show when I'm sanding it down!
Then there are no opportunities to do any more for a couple of weeks.
Maybe I can find time to do some work on seat and seat carriage at
home... Oh, and yes, Happy Christmas to my reader(s).
29/12. Interesting little errorette today... I'd just coated parts of the seat carriage with filler to tidy up some of the lumps and bumps, and brought it into the house to cure in the warm. I have the habit, good or bad I can't say, of putting some polythene sheet over curing filler so that I can smooth it out with my fingers while its still soft without getting epoxy on my hands. I trust, by the way, you do all know that boat building epoxy is toxic, and perhaps worse still you can get sensitised to it. If you get sensitised to it you will come out in a rash if you go anywhere near a epoxy building shop. These facts being the case you should all take great care not to get the stuff on your hands or other skin. But I digress. So anyway I just grabbed a plastic bag to provide the polythene sheet. When I've done this in the past the ink from the pattern on the bag has tended to stay on the lay-up but otherwise no issues. Today, however, it seems I grabbed one of her ladyships ecologically sound biodegradable plastic bags. And it seems that this material sticks to epoxy far better than ordinary polythene does... Oh dear. Never mind, it will all sand off, just clog a bit more sandpaper I suppose...
30/12. Coat of primer on the seat carriage after taking down the filler. As ever a horde of little holes appeared. I don't know if its really worth taking the trouble to fill these: it will certainly add nothing to the function but whatever. I shall see how I feel. I'm going to do the seat and seat carriage in one pot paint. The solvents from two pot lead to appreciable domestic discord, and there's the saving in the price of the paint too...
6/1/2008. Seat and seat carriage are now primed, with quite a bit of filling and so on of pinholes in the seat carriage. One change to the seat carriage has been to make some holes in the base. It occurred to me that as it was it made a splendid water carrier and should have been good to carry a couple of gallons or so of spray round the track. So I've made what look superficially like lightening holes in the base panels, but are really for water to drain away.
13/1/2008. Here's the seat and carriage with some topcoat on. To tell the truth Its pretty diabolical painting... It will need a good bit of attention when completed, depending on how enthusiastic I feel. Probably not too much: I'd like to get some sailing in...
19/1/2008. Weekend down at my parents doing some work. I've put a coat of topcoat on the foredeck and a coat of International deck paint on the crew deck. The colours aren't quite sympathetic, but never mind eh... I've also started thinking about gear. The first thing is to make some brackets for control lines and I've laminated up three layers of 3mm ply into a fairly tight curve which will become the basis for brackets for control line and jib cleats. I use ply for the base because its safer to bolt through. If there's a need for supports then that will be made from offcuts of the carbon flat panel used for just about everything so far...
20/1/2008. More paint on the foredeck. Unfortunately the location is
so horribly dusty that its practically a non-slip finish. I shall
try taking the lumps off with very fine wet and dry and then
burnishing it when finished. I want to try put a coat of topcoat on
the underside soon, and that can't have the same result. I wonder if
I can build a polythene tent and keep enough dust out...
I
also started thinking about the location of fittings and so on. The
original layout didn't feel very congenial to me. I also need to
start thinking about the fine detail of how to set the mast on the
stump. I'll also want a way of keeping the mast up when the jib
isn't...
2/2/2008. Another week of work. Hopefully I can get most things done
this week. The plan is to get on with the fitting out, then turn her
over and finish the can of two pot on the underside, which is
probably only really one good coat. That will do to get back sailing
again and sort a few things out then I'll look at getting a decent
coat of paint from a pro in a month or so. Once into the sailing
season it should be easier to schedule. I hope.
Started
looking at the kicking strap and cunningham arrangements. These are
going to be a bit tricky because, as previously mentioned, the
takeoff is really too low for satisfactory clearance. I'll see if I
can work something out, but if not I do have a "cunning plan" to
route the last take off in a very unconventional manner. The
cunningham will just route off to one side so that it runs under the
kicker. The top end of the cunningham will have an unconventional
set-up I learned from Dave Roe, multiple Cherub Champion in the
1990s. The cunningham line will go up to the sail, down round the
boom and back up the sail again. By having the boom pulled up by the
cunningham in opposition to the kicker some of the load is taken off
the gooseneck, which has been a problem in the past. The concern is
friction of course. What I've done is to put two layers of kevlar
about 10mm wide over the boom where the rope will run so that there's
ultimate wear resistance, and then dolloped over a good thick layer
of epoxy thickened with graphite to reduce the friction. File a
narrow slot as a rope guide and a hoop over the top to keep the
string in position and it should be good. At least it worked on the
Cherub...
I think I'm going to have to get light alloy seat
tracks from Rob Michael. Silly not to: its another kilo saved I
reckon. I hope he's got some available, I keep forgetting to ask. I
have a nagging feeling I've got the carriage tracks too far forward.
Still, I sail inland, shouldn't be a big issue, and its easy enough
to put a bit more batten in... If you see me going down the mine all
summer you'll know I got it wrong... What else... I need to make an
arrangement to step the mast on the stump that locks it in place and
stops it rotating, put on halyards and position the jib tracks. In a
rare addition of complication there will be adjustable barber
haulers. I can't cope without 3d adjustment of the jib slot.
3/2/2008. I spent most of today fiddling with the mast set-up. There's no doubt that the stump rig is a deal more hassle than something more conventional... I took the top of the stump off flat and offered up the mast to get an idea of how much to chop off. Then its a question of reinforcing the new mast foot. It needs to have enough structure to deal with the loads, which will tend to be very less than evenly distributed round the circumference, and it also needs reinforcement to deal with the jib halyard block which will go through it a bit above the foot. The main halyard will come out of the stump - this may become clearer later - so just goes straight through the bottom of the mast. So there's one turn of kevlar cloth round the mast, six times round with unidirectional carbon and three times round with carbon cloth to strengthen it up. Then we also need a means to stop the mast falling off the stump. This has been made with successive pieces of tube, each with a bigger slot cut in so that they can be nested inside each other. The first goes flush with the mast foot to increase the bearing area and also to provide some clearance. The next two project about 10mm and will form the tenon. Finally there's a layer of cloth right round the inside to keep it all together. The last step will be some kind of pin to stop the mast turning on the stump.
4/2/2008. Fittings, fittings. I usually enjoy this, but its been a bit of a struggle this time, goodness knows why. No point in putting up photos of half completed fitout, its pretty meaningless. I'm still struggling with exactly how I shall tension my jib halyard, and the kicker is still a concern, but things are making progress. More tomorrow I expect... Checking up with Rob tonight I think I probably have the aft end of the seat tracks about 60mm further from the stern than conventional, so that's really not a big deal - unless there are big lumps and big breeze at the Champs...
5/2/2008. Making progress on the gear. The central "console" for control line cleats is in with its turning blocks, I've worked out the halyard arrangements and the jib cleating... Kicker still to do... The tracks and barber haulers for the jib are another fiddly bit, and will have to wait until I have the mast up to establish the precise location... getting there... It looks as if I'm going to leave off shroud adjustment again. My head tells me that the ability to free off the lee shroud running square is important, but heart, which has never owned a boat with adjustable standing rigging, is still unconvinced!
7/2/2008. Coat of paint on the bottom. I made a tent of polythene to
keep dust from the roof space etc off: it will be interesting to see
how well it works. My painting is pretty despicable really, still it
will do for a while.
I did make a polythene tent to do the
painting in, and its certainly helped with the dust - worth doing.
One more job is to sand down the outside edge of the gunwales and
varnish. Not the biggest of tasks... There are still some fittings
and so on to do, and in particular the lever kicker to fabricate and
then make the various new pieces of string with eye splices to the
correct length. And I need to put sliders on the seat carriage and
and... No sailing this weekend then, and next week I'm booked too...
8/2/2008. Fiddly jobs... Finishing off some of the fittings for
instance. I made a crude lever for the kicker from aluminium sheet. I
gave it a flange on the long edge for some stiffness. I didn't spend
a lot of time on this - its deliberately crude so that I don't mind
hacking it about until its the right size. This is going to be an
ordinary 70s type affair that goes into the line. A couple of folk on
the Canoe forum have pointed me at the considerably superior design
used on Finns and OKs, where a pivot goes through the boom and the
lever is in two halves, each side of the boom. This does look like
the way to go in the long term, but it would require quite a lot of
work on my ex-Megabyte mast boom, and I can't raise the enthusiasm
right now!
Another job was to add some packing onto the
rudder "stock" as it isn't quite flush with the hull
surface. Another thing that occurred to me is the need to get the
seat carriage on exactly the same plane before I bolt on the sliders
for the carriage rail - otherwise its bound to bind. So I came up
with the technique ( in the fuzzy (I think I now have a Norwegian
Blue camera) photo) of stapling some strip sandpaper down on to the
workbench. Of course I should finish up on a sheet of plate glass -
yeah right...
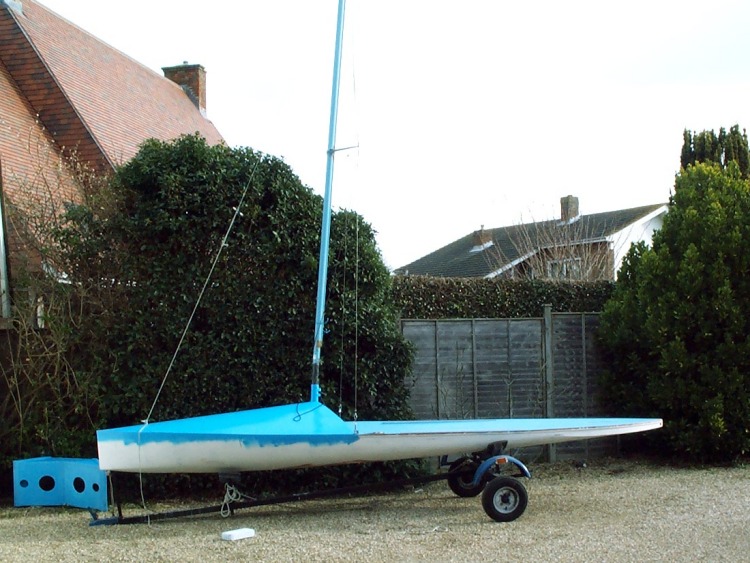
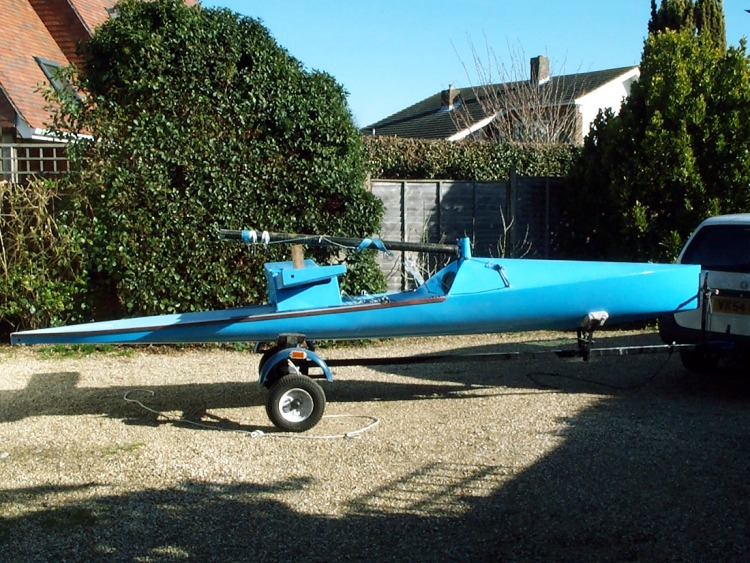
10/2/2008. Well, the boat is out of the workshop at my parents and
back at my own house. This is a major milestone of course, and its
getting close now. There are a good lot of odds job to do, especially
splicing ends on dyneema plait and getting the lengths right, sanding
the foils and other odds and bits. Maybe weekend after next to get
wet... Other jobs in the last two days have included some clear
primer on the gunwales, bolting on the new seat carriage and fitting,
I think there my be s little bending of the tracks needed to promote
smooth sliding, and various other odds. These last few bits and
pieces really add up, but at least I'll be able to do a few bits in
the evenings. Now where are my splicing fids?
I have to say
that I'm not over enamoured with the colour now I see the boat
finished. I wish those SOBs at International hadn't dropped my
favourite light blue from their two pot range. Maybe when I get the
pro job done I should ask them to put a dash of white in the mix so
that its more to my taste. Bit of a pig for them to match colours
though. However she won't stay plain blue, I can promise you that,
and maybe the little extras will reconcile me to the appearance...
16/2/08. Got the last of the strings and things today except for some shock cord - it turns out that my rerouting of control lines means I need longer elastic for the takeups. It should't be a problem to get some. I think everything else is pretty much done. To my disgust I discovered that Guldford Marine, at their new shop, have two cans left of my preferred International two pot blue - you may recall me bewailing my inability to get it earlier. If only I'd known... [update, a week later. Double checked, its not the favourite blue, its a slightly darker shade I've also used. I have found a little bit of the right blue in the garage, hopefully enough to touch up the mast come warm weather]. I'm just giving the rudder and daggerboard a treat. You can't really do too much work on the foils I reckon. Oh, the bungs need to go on boat and sliding seat, and the toe strap back on the sliding seat, and a stop to prevent the mast rotating on the stump... There are always things. I'm booked tomorrow but the plan is still to see if we can go yachting next weekend...
23/2/2008. Lots of fiddling and remembering things I'd missed
today... The arrangement for taking the jib ends to the sliding seat
needed sorting on the old seat - I'd forgotten it wasn't the same as
the new one, I needed to tweak the outhaul, make a stop line so that
the seat can't slide too far, all sorts of odds and bits. I still
have to install the bungs and do a decent install job on the
gooseneck fitting, and I have yet to decide how to do a stop so that
the mast cannot rotate on the stump. I think I've got enough to go
sailing tomorrow, but it will doubtless depend what things look like
when I rig near the water...
The boat is down at the sailing
club with the mast up though, its really not far away now. Thinks,
must go and charge the batteries for the camera...
24/2/2008. Well the plan was to head up this installment with a photo
of the boat in action. I left the camera at home... To tell the truth
I didn't do a lot of sailing: it was a tad windier than I hoped. High
teens of knots was not what I had in mind for a shakedown cruise.
The snag list really isn't too bad. The jib cleats are a touch low
for easy cleating and require another wedge under them. I might have
to put a block in rather than a fairlead but we shall see. With the
sheets now cleating on the lee side the windward sheet can easily
drop too far out of reach coming out of a tack, so I need to set up a
lead or something on the windward side of the carriage to make them
easier to reach. The Barber hauler lines are a bit prone to come out
of the cleat. They need thicker line and a bigger stop knot. The end
line for the cunningham is way too short: don't know how I managed
that. Somehow the mast rake was way out, and the kicker lever
position needed adjusting, but was well within the range of the
existing splices. Carriage and seat stood up just fine, but I didn't
remotely load them up. I'm pleased. The biggest snag was me - sailing
fitness seems to have gone completely.There's one other snag, a
somewhat ironic one... Packing the boat away I noticed a substantial
area of wet rot on my trolley cradle! It could be an excuse to order
up a nice light alloy one. I don't think I can face any more
fabrication.